Back to Course
Teach Language for Learning
0% Complete
0/0 Steps
-
Module introduction5 Topics
-
Overview21 Topics|4 Tests
-
Cover
-
Lesson objective
-
Opening the lesson
-
Features of Direct Instruction overview
-
Why language instruction?
-
Who it’s for and why it works
-
Why it works
-
LFL for playschool students
-
LFL Lesson 2, exercise 4
-
Language for Learning materials
-
Teacher’s Guide
-
How to set up a group
-
Teacher presentation books
-
LFL lesson 1 exercise 1 with error correction
-
Why signals?
-
Hand-drop signal
-
Hand-drop signal
-
Point-touch signal
-
Point-touch signal
-
Review
-
Lesson completed
-
Cover
-
Actions A17 Topics|4 Tests
-
Cover
-
Lesson objective
-
Opening the lesson
-
Why teach action exercises?
-
Video (VIDEO UNDER DEVELOPMENT)
-
Basic actions – beginning actions
-
Video (VIDEO UNDER DEVELOPMENT)
-
Correcting errors
-
Correcting errors: part 2
-
Video (VIDEO UNDER DEVELOPMENT)
-
Actions — statements
-
Video (VIDEO UNDER DEVELOPMENT)
-
Actions — parts of the body
-
General correction procedure
-
Video (VIDEO UNDER DEVELOPMENT)
-
Review
-
Lesson completed
-
Cover
-
Actions B20 Topics|3 Tests
-
Cover
-
Lesson objective
-
Opening the lesson
-
Kinds of action exercises
-
Actions — pictures
-
Video
-
Action statement — pictures
-
Video
-
Individual turns
-
Video
-
Steps of individual turns
-
Test your understanding
-
Action statement with ‘not’
-
Video
-
Action — pronouns
-
Action — tense demonstration
-
Action — tense — pictures
-
Video
-
Review
-
Lesson completed
-
Cover
-
Description of objects A20 Topics|3 Tests
-
Cover
-
Lesson objective
-
Opening the lesson
-
Why teach description of object exercises
-
Kinds of description of action exercises
-
Video
-
Object identification
-
Video
-
Identity statements
-
Video
-
Identity statements no model
-
Yes-or-no questions and ‘not’ statements
-
Video
-
General correction procedure
-
Yes-or-no questions/’not’ statements/no model
-
Video – WITH VIDEO
-
Common objects
-
Test your understanding
-
Review
-
Lesson completed
-
Cover
-
Description of objects B18 Topics|4 Tests
-
Information and background knowledge A19 Topics|4 Tests
-
Cover
-
Lesson objective
-
Opening the lesson
-
Why teach information and background knowledge
-
Basic information
-
Video
-
Basic information – school
-
Video
-
Days of the week
-
General correction procedure
-
Months of the year
-
Seasons
-
Video
-
Purpose of part/whole
-
Pause and punch
-
Part/whole
-
Video
-
Review
-
Lesson completed
-
Cover
-
Information and background knowledge B16 Topics|4 Tests
-
Instructional words and problem-solving concepts A24 Topics|4 Tests
-
Cover
-
Lesson objective
-
Opening the lesson
-
Purpose of instructional words and problem-solving concepts
-
Spatial and temporal Relations- First, next
-
Video 28 LFL Lesson 17, exercise 3
-
Video
-
First, next, last
-
General correction procedure
-
Purpose of teaching prepositions
-
Prepositions demonstration
-
Prepositions with pictures
-
Video 29 LFL lesson 31, exercise 5 with error correction
-
Video
-
And – actions
-
Same/different
-
Same
-
Video 30 LFL Lesson 96, exercise 6
-
Video
-
Actions different
-
Video 31 LFL lesson 113, exercise 1
-
Video
-
Review
-
Lesson completed
-
Cover
-
Instructional words and problem-solving concepts B18 Topics|4 Tests
-
Classification A12 Topics|4 Tests
-
Classification B12 Topics|4 Tests
-
Problem solving strategies and applications A11 Topics|4 Tests
-
Problem solving strategies and applications B14 Topics|4 Tests
-
Workbook23 Topics|4 Tests
-
Cover
-
Lesson objective
-
Opening the lesson
-
Purpose of workbook exercises
-
Content of workbook exercises
-
Presenting the workbook activities
-
Auditory signal
-
Touching, colours, cross-out marks
-
Video
-
Video
-
Correcting workbooks
-
Pair relations
-
First/next
-
Video
-
Video
-
Part/whole, shapes, opposites, plurals
-
Classification, concept applications
-
Prepositions, locations
-
Same/different, some/all/none, materials
-
Video
-
Video
-
Review
-
Lesson completed
-
Cover
-
Stories, poems, additional activities, expanded language activities17 Topics|4 Tests
-
Cover
-
Lesson objective
-
Opening the lesson
-
Why teach stories and poems?
-
Stories and poems in LFL
-
Presenting stories and poems
-
Video
-
Video
-
Purpose of expanded activities
-
Included activities
-
Parent letters
-
Language Activity masters
-
Language Centres for Young Learners
-
Video
-
Video
-
Review
-
Lesson completed
-
Cover
-
Mastery tests and data collection18 Topics|4 Tests
-
Cover
-
Lesson objective
-
Opening the lesson
-
Measurable student improvement
-
Mastery test materials
-
Conducting mastery tests
-
Video 50 Conducting mastery tests
-
Video
-
Scoring mastery tests
-
Video 51 scoring mastery tests
-
Video
-
Extra help
-
Attendance on Student Progress Tool (SPT)
-
Lesson progress on SPT
-
Record independent work on SPT
-
Mastery tests on SPT
-
Review
-
Lesson completed
-
Cover
-
Motivating students and positive feedback17 Topics|4 Tests
-
Cover
-
Lesson objective
-
Opening the lesson
-
Engaging students
-
Teacher’s role in motivation
-
Video 12 Language for Learning Lesson 1, exercise 4 with error correction
-
Video
-
STAR rules
-
STAR rules continued
-
Teacher-student game
-
Teacher-student game points
-
Video 52 Teacher-student game
-
Independent work
-
Positive praise
-
Specific praise
-
Review
-
Lesson completed
-
Cover
-
Practise time, lesson 4429 Topics|2 Tests
-
Cover
-
Lesson objective
-
Opening the lesson
-
Checklist for teaching a complete lesson
-
LFL lesson 44, exercise 1
-
Video
-
Video
-
LFL lesson 44, exercise 2
-
Video
-
Video
-
LFL lesson 44, exercise 3
-
Video
-
Video
-
LFL lesson 44, exercise 4
-
Video
-
Video
-
LFL lesson 44, exercise 5
-
Video
-
Video
-
LFL lesson 44, exercise 6
-
Video
-
Video
-
LFL lesson 44, exercise 7
-
Video
-
Video
-
LFL lesson 44 Workbook
-
Video
-
Review
-
Lesson completed
-
Cover
-
Module evaluation survey1 Topic
Participants 499
Lesson 2,
Topic 12
In Progress
How to set up a group
ddewell@goodtogreatschools.org.au August 8, 2023
Lesson Progress
0% Complete

How to set up a group
To organise students for LFL, follow these directions:
Seat students in a curved row of chairs.
- Students should sit in chairs, not on the floor.
- Sit so that you can observe every student in the group as well as other members of the class.
- For larger groups, arrange students in two rows.
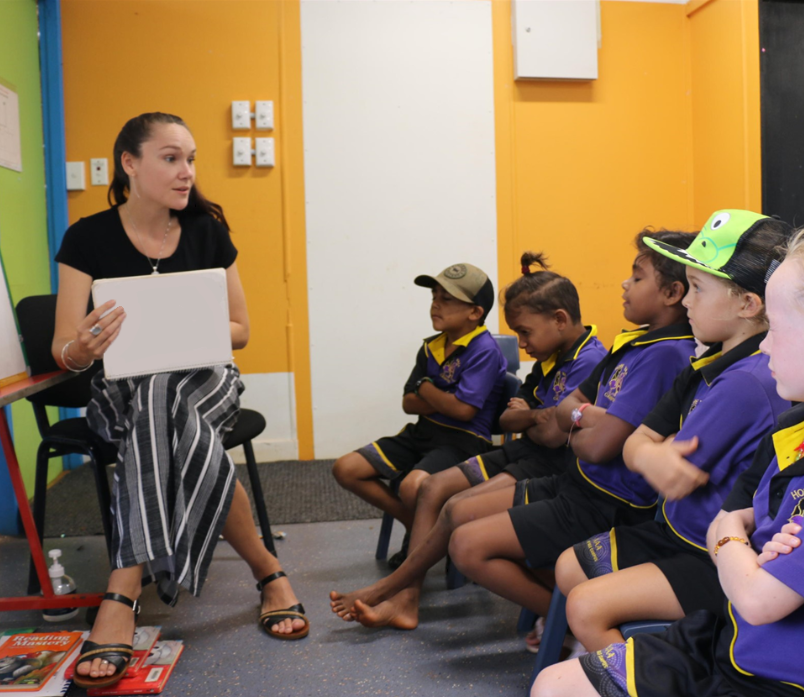
Arrange students by their instructional needs.
- Seat students who need the most help right in front of you.
- Seat the students who are likely to need the least help at the ends of the rows.
- You will naturally look most often at the students seated directly in front of you.
- You will be able to know if their responses are correct.
Assign the seats.
- The students should sit in their assigned seats every day.
Sit close to the students.
- Seat the students close together.
- Be close enough to students to be able to have them touch a picture in the presentation book.
- Keep students within arm’s reach.
Make sure students can see the pictures.
- Students need to look at the pictures for many exercises.
- Check that they can see the book.
- Hold your head next to the book and see if you can see the eyes of all the students.
- If you must look almost sideways to see a student’s eyes, that student won’t be able to see what is on the page.